Mushrooms, nature’s delights, may be a foodie’s dream, but they often come with a high price tag at the supermarket. However, growing your own mushrooms at home is a cost-effective and eco-friendly endeavor. In this article, we’ll delve into a creative method of growing mushrooms using recycled 5-liter plastic bottles. By following these simple steps, you can enjoy a bountiful harvest of fresh mushrooms in just 45 days.
Materials and equipment needed:
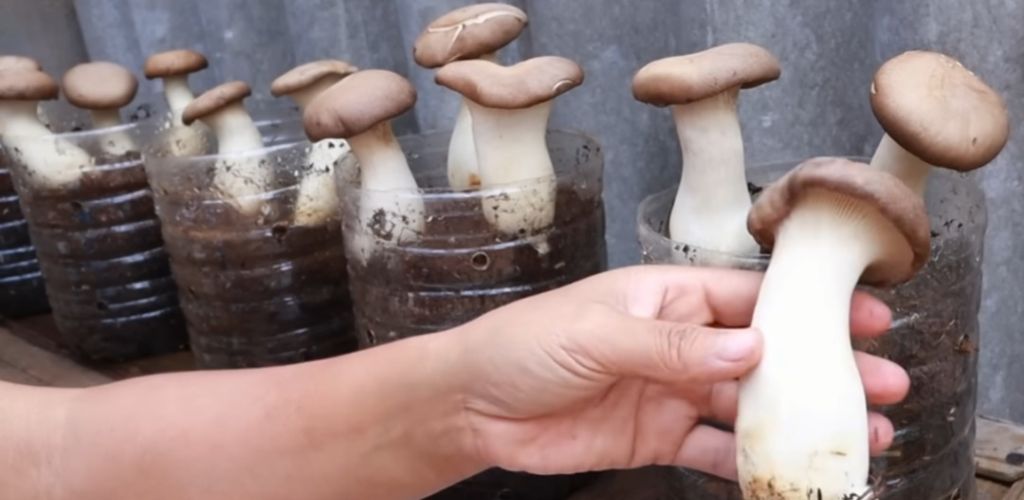
5L
recycled plastic bottles Straw
Fungal spores or mycelium
Plastic
wrap High-pressure
watering can Potting soil and substrate
Step 1: Preparing the bottles
Start by choosing 5-liter plastic bottles. Make sure they have been thoroughly cleaned and sanitized, to have a clean base for growing mushrooms. Cut off the top of each bottle while keeping the bottom intact, which will serve as a container for the mushrooms.
Step 2: Preparation of the straw
Straw is an excellent breeding ground for several species of fungi. Boil the straw to sterilize and soften it. After boiling, let it cool and drain off any excess water.
Step 3: Creating Air Holes
To promote proper air circulation, use a drill or heated metal rod to create small holes on all plastic bottles. Proper ventilation is crucial for successful mushroom growth.
Step 4: Layering the bottles
Layer the bottom of each plastic bottle with the boiled and cooled straw, creating a comfortable bed for the mushrooms. Make sure the straw is evenly distributed and lightly compacted.
At this point, place the mushroom spores or mycelium on the bed of straw. Add another layer of straw to create a mixture of straw and fungal spores in each bottle. This combination will serve as a breeding ground for mushrooms.
Step 5: Cover with plastic film
Place plastic wrap on top of each bottle to create a semi-sealed environment. This cover helps maintain moisture levels inside the bottle, promoting the growth of mycelium, which is essentially the root system of the fungus.
Step 6: Initial Watering
Use a high-pressure watering can to gently moisten the straw and spores of the fungus. This first watering ensures that the growing medium is properly hydrated.
Step 7: Growth Tracking
Over the next 12 days, take a close look at your bottles. You’ll start to notice changes as the mycelia network expands within the straw. Once you’ve observed the signs of growth, it’s time to carefully remove the plastic wrap.
Step 8: Second Watering Cycle
After removing the plastic wrap, continue to water the mushroom bottles regularly. This time, water directly into the bottle through the top opening, making sure the growing medium stays moist.
Step 9: Adding Potting Soil and Substrate
Approximately 12-15 days after removing the plastic wrap, introduce a layer of potting soil and substrate to the top of each bottle. This mixture provides the essential nutrients for the mushrooms entering the fruiting stage.
Step 10: Continuation of Watering and Growth
Continue to water the bottles as the mushrooms grow. In about 45 days, the mushrooms will be fully grown and ready to harvest. For best results, it’s essential to maintain consistent humidity and humidity levels throughout the process.
Growing mushrooms at home from recycled plastic bottles is an eco-friendly and cost-effective way to enjoy these delicious mushrooms. By diligently following these steps, you can turn your kitchen into a mushroom paradise, providing a fresh and sustainable source of culinary delights at your fingertips.