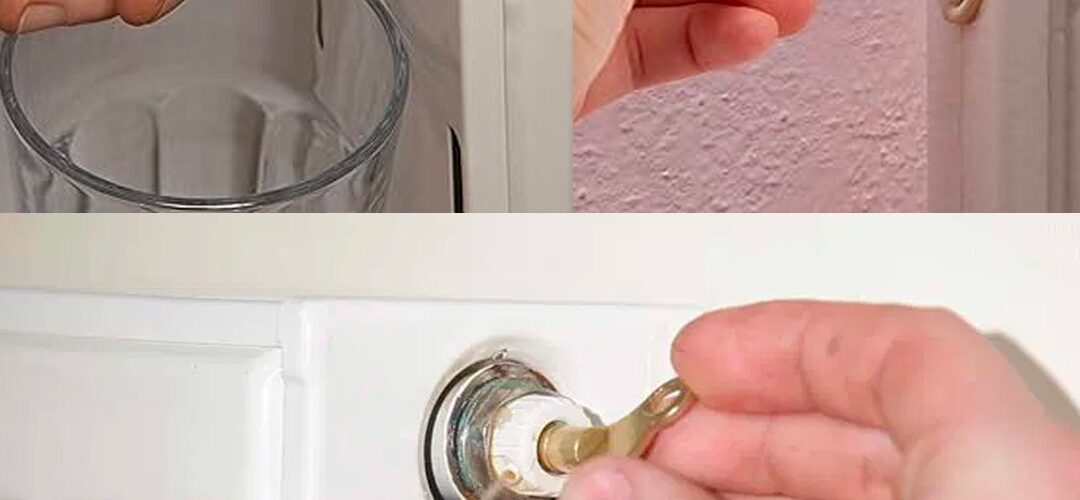
If you’re noticing cold spots on your radiators or if your heating system isn’t working as efficiently as it should, it could be due to air trapped in the system. This is a common problem, especially in homes with older heating systems. Purging the radiators by releasing air can help restore their efficiency, but what about removing water from your radiators during the process? Let’s explore how much water should be removed from your radiators for effective purging, and how to do it safely.
Why Purging Your Radiators is Important
Before diving into how much water you need to remove, let’s first understand why purging your radiators is essential. Over time, air can accumulate in your radiator system, preventing hot water from circulating properly. This causes your radiators to become less effective at heating the room, with cold spots often forming. Purging removes trapped air, allowing the radiator to heat up evenly and your system to work efficiently again.
How to Purge Your Radiators: The Process
When purging a radiator, you are essentially releasing trapped air from the system, but the process also involves letting some water out. Here’s a step-by-step guide on how to do it:
- Turn off the Heating System: Before you start purging, make sure your heating system is off and the radiators have cooled down. This ensures you’re not dealing with hot water and also prevents injury.
- Locate the Bleed Valve: Every radiator has a bleed valve, which is usually located at the top of the radiator. This is the valve you’ll use to release the trapped air. You’ll need a radiator key (or a flathead screwdriver, depending on the type of valve).
- Place a Container or Cloth Beneath the Valve: Have a small container or cloth handy to catch any water that comes out when you open the valve. Even though the main goal is to release air, some water will come out along with it.
- Open the Bleed Valve Slowly: Turn the valve slowly counterclockwise. You should hear a hissing sound, which is the air being released. Once the air stops and you hear water trickling out, it’s a sign that the radiator is fully purged.
- Close the Valve: Once water flows steadily without any air bubbles, quickly close the valve by turning it clockwise.
- Check the Pressure: After purging, it’s important to check the pressure on your boiler. Purging radiators can cause a drop in water pressure, so you may need to top up the system by adding water through the filling loop (usually found on the boiler).
How Much Water Should Be Removed?
When purging radiators, the main focus is on releasing the air trapped inside the system rather than removing large amounts of water. In fact, removing too much water from your radiator system can lead to a drop in pressure, which can affect the heating system’s performance.
Typically, when you open the bleed valve to let the air out, only a small amount of water (a few drops to a cup’s worth) will escape. This is perfectly normal and should not result in significant water loss. If you notice that large amounts of water are coming out, or if the pressure drops drastically after purging, it might indicate an issue with your system that requires further attention.
It’s essential to ensure that you don’t remove more water than necessary during purging. The main aim is to release trapped air and restore proper circulation, not to drain the system entirely. If you’re unsure about how much water to remove, you can always check the system’s pressure after purging and adjust as necessary.
When Should You Remove Water From Your Radiators?
It’s important to know when purging is necessary. Here are some signs that your radiators might need purging:
- Cold spots on the radiator: If parts of your radiator are cold while others are hot, it’s likely that there’s air trapped inside.
- No heat at all: If the radiator is not heating up at all, air might be blocking the flow of water.
- Gurgling or bubbling noises: If you hear strange sounds coming from the radiator, it’s often a sign of air in the system.
- Longer heating times: If your radiator takes longer than usual to heat up, trapped air could be the culprit.
Other Tips for Effective Radiator Maintenance
While purging is important, here are some other maintenance tips to keep your heating system running efficiently:
- Check the Boiler Pressure: Always keep an eye on the water pressure in your system. Low pressure can result in poor heating performance.
- Regularly Bleed Your Radiators: It’s a good idea to check your radiators at least once a year for air buildup, especially before the colder months.
- Look for Leaks: If you notice a significant loss of water or a drop in pressure after purging, there might be a leak in the system that needs to be fixed.
- Use a Power Flush if Needed: If air build-up is frequent, it might be worth investing in a power flush to clear sludge or debris from the system, which can block the flow of water.
Final Thoughts
Purging your radiators is an essential part of maintaining your heating system and ensuring it runs efficiently. When purging, remember that you’re only removing a small amount of water along with the trapped air. If you’re unsure, always check your system’s pressure after purging to ensure everything is running smoothly.
If you found this article helpful, don’t forget to like, share, and comment below! Sharing this guide with friends and family can help everyone keep their radiators working at peak efficiency and stay warm during the colder months.